
Why Andersen RV Wheel Chocks Make Leveling Faster
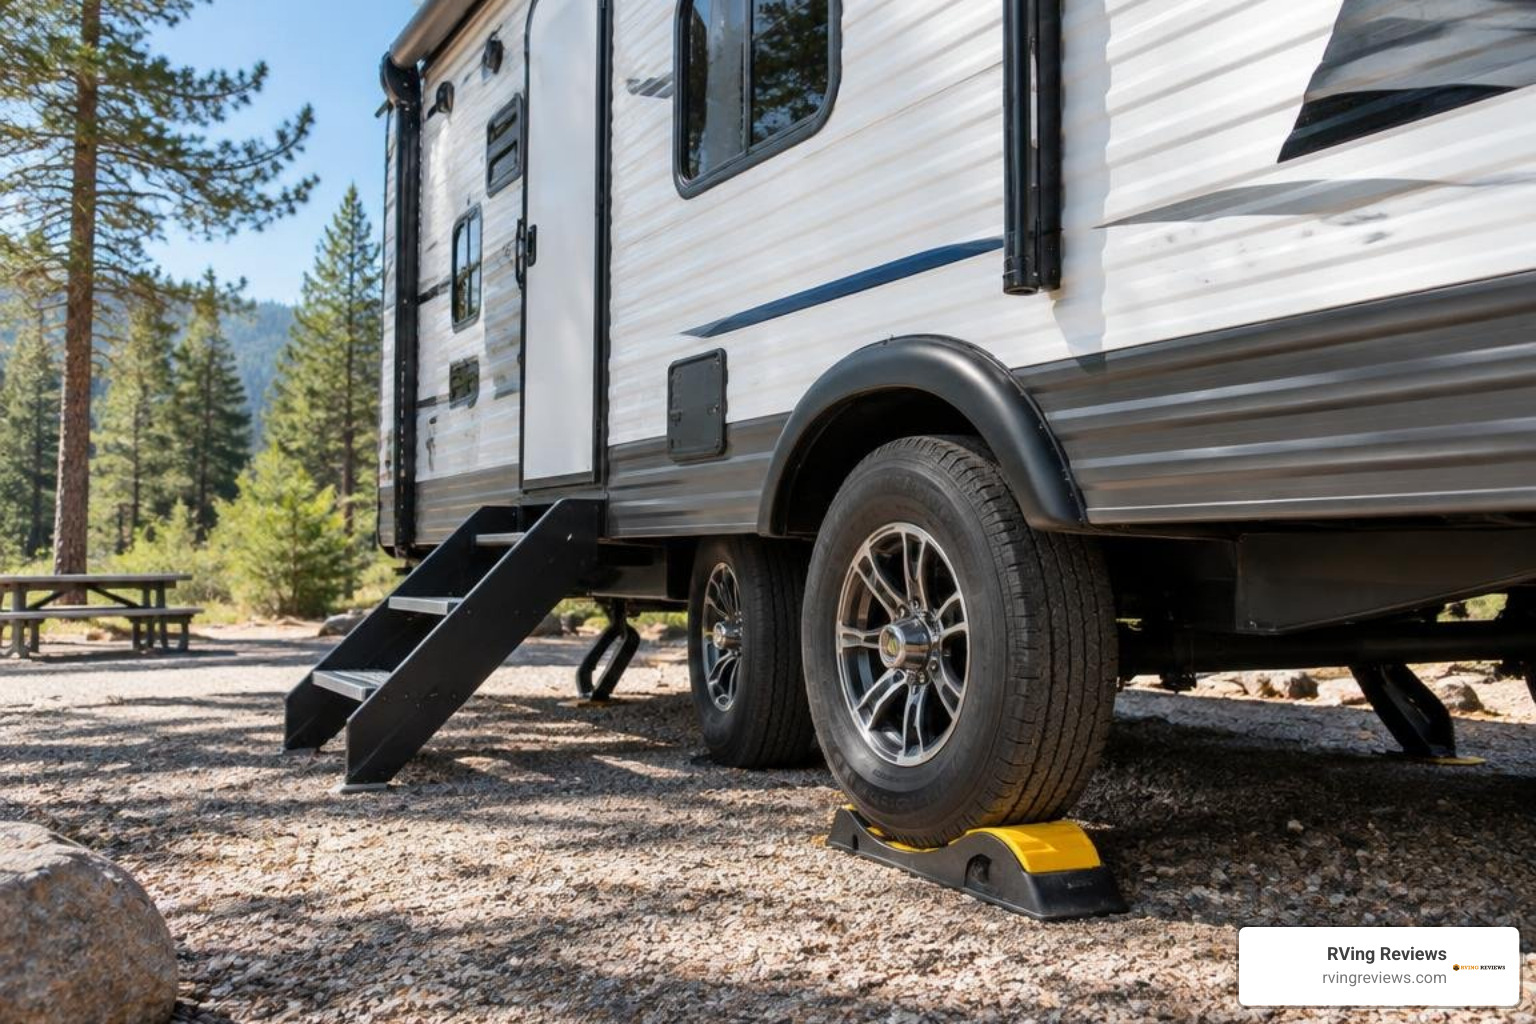
If you’re shopping for Anderson RV wheel chocks, the Andersen Camper Leveler is the one to consider for quick side-to-side leveling. Drive the low-side tires slowly onto its curved ramps until the trailer is level, then fit the matching chocks to hold the ramps in place. There are no blocks to stack or fixed height steps to guess at.
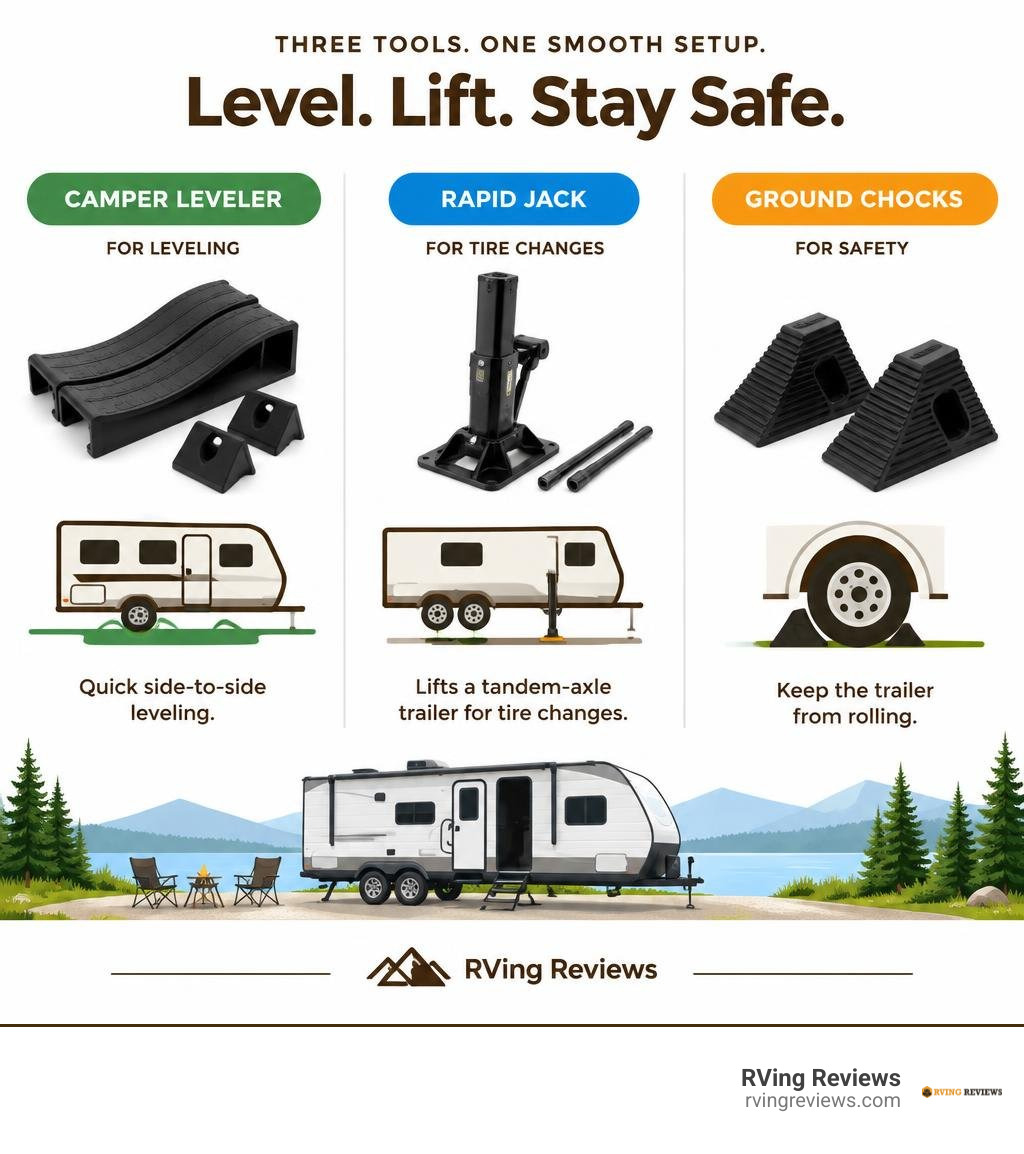
The Camper Leveler is for campsite leveling; the taller Rapid Jack is mainly for lifting a tandem-axle trailer during a tire change. Neither replaces a careful setup: place ground chocks against the wheels on the other side before unhitching.
I’m 📈Benjamin Beck, Growth Marketing Expert. I’ve spent more than 14 years building research-led content for travel and outdoor brands, and I bring that approach to this review of Anderson RV wheel chocks.
Complete Guide to Anderson RV Wheel Chocks and Leveling Systems
Setting up camp should be the easiest part of your trip, yet side-to-side leveling remains one of the most frustrating chores. Traditional plastic interlocking blocks force you into a game of guesswork: pull forward, check the level, realize you need another half-inch, back off, rebuild the stack, and try again.
Andersen Hitches changed this dynamic by introducing curved drive-on wedges. Instead of fixed 1-inch steps, the curved design creates a continuous incline. You roll onto the wedge until your trailer is perfectly level, whether you need 0.5 inches or 3.75 inches of lift.
When outfitting your rig with proper towing gear, choosing the correct tool for the job is essential. Andersen offers three distinct products in this category: the Camper Leveler (model AM3604), the Rapid Jack (model AM3620), and the heavy-duty Tuff Chock.
All three products are manufactured in the United States using durable, 100% recycled plastic formulations. Their thick-wall construction resists oil, grease, dirt, and road grime. Andersen backs these molded components with a lifetime warranty against manufacturer defects and cracking under normal use (note that secondary accessories like remote latch cables on specialty towing assemblies carry separate warranty exclusions).
| Model | Primary Purpose | Dimensions (L x W x H) | Max Lift Height | Weight Capacity | Max Tire Diameter |
|---|---|---|---|---|---|
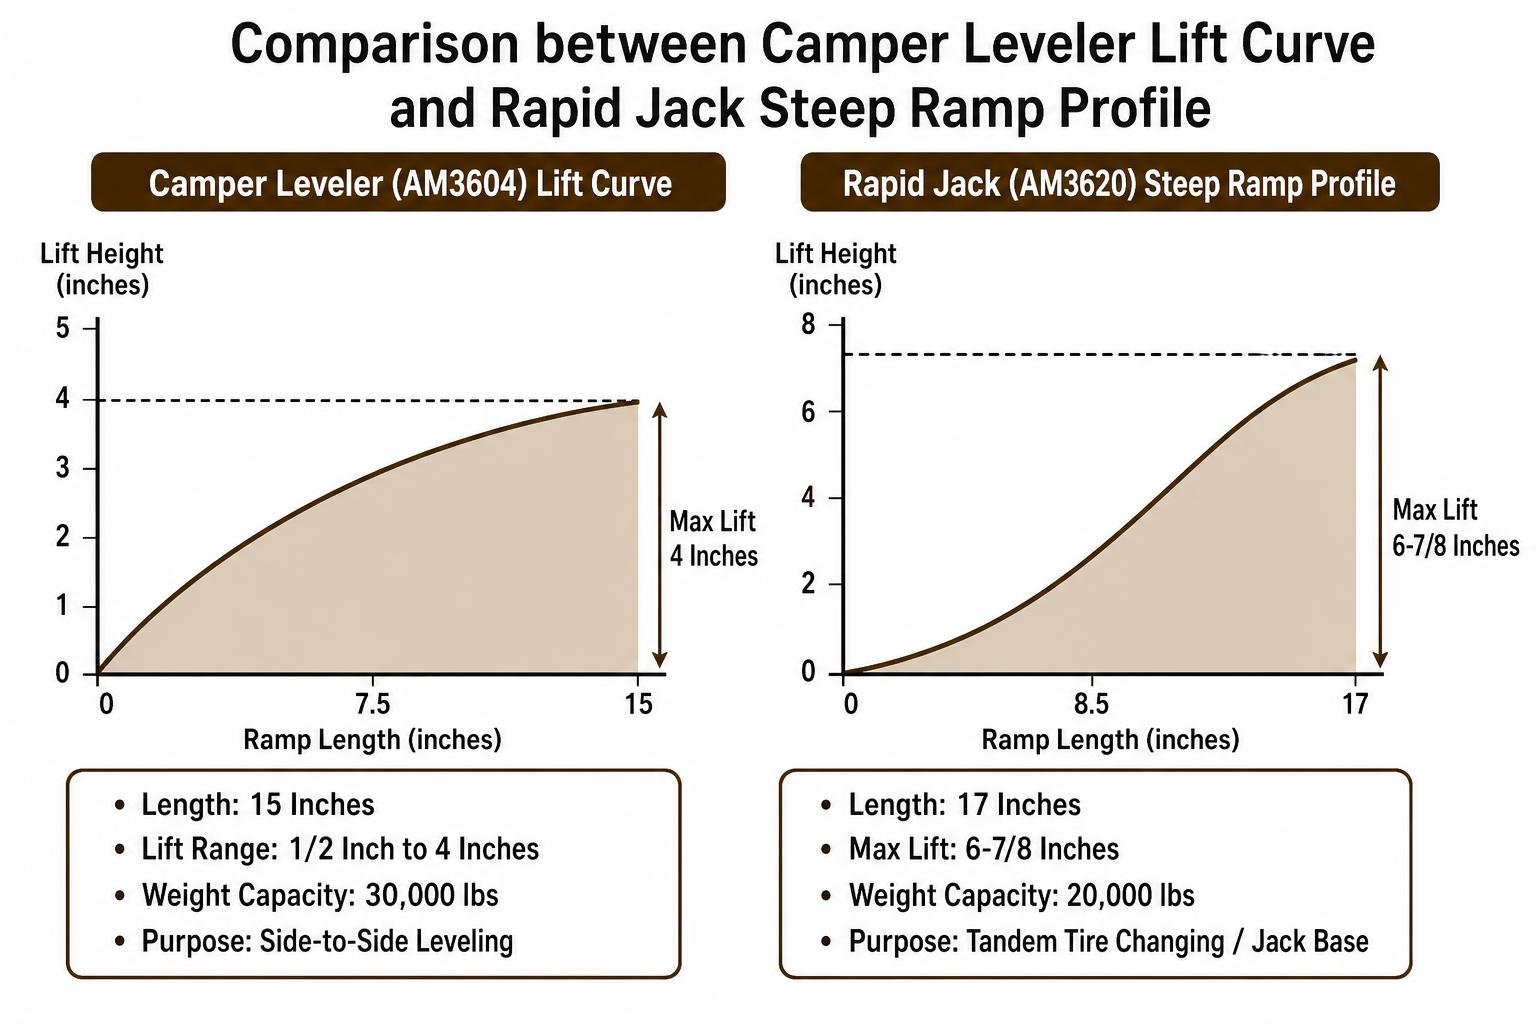
| Camper Leveler (AM3604) | Side-to-Side Leveling | 15″ x 6″ x 4″ | 4 Inches | 30,000 lbs | Up to 32 Inches |
| Rapid Jack (AM3620) | Tandem Tire Changing / Jack Base | 17″ x 6″ x 6-7/8″ | 6-7/8 Inches | 20,000 lbs | Up to 32 Inches |
| Tuff Chock | Standalone Chocking & Wedge Lock | 8″ x 6″ x 4.5″ | N/A (Chock) | Heavy Duty | Universal |
Andersen Camper Leveler vs. Rapid Jack Differences
While they look similar at a glance, the Camper Leveler and Rapid Jack serve entirely different operational purposes. Confusing the two is a common mistake for newer RV owners.
The Camper Leveler (AM3604) is 15 inches long and engineered specifically for tandem-axle campsite leveling. Its compact profile lets it slide neatly between tandem tires with standard spacing. It provides a lift range from 1/2 inch to 4 inches and supports rigs weighing up to 30,000 lbs. Rated 4.7 out of 5 stars across more than 5,500 customer reviews, the two-pack kit ($95.98) has become an industry standard for bumper-pull travel trailers and fifth wheels.
The Rapid Jack (AM3620) is a larger, steeper tool measuring 17 inches in length, 6 inches in width, and 6-7/8 inches in height. It has a weight capacity of 20,000 lbs and holds a 4.6 out of 5-star rating on etrailer.com, with a 99% customer satisfaction rate.
Because of its 17-inch length and steep curve, the Rapid Jack cannot fit between closely spaced tandem wheels for side-to-side campsite leveling. Instead, its primary purpose is roadside emergency tire replacement. Driving the good tire of a dual-axle trailer onto the Rapid Jack lifts the adjacent flat tire roughly 6 inches off the ground, bypassing the need to crawl underneath with a hydraulic bottle jack. To learn more about its construction, review the technical specs of the Andersen Rapid Jack.
Andersen Tuff Chock and Wedge Interlocking Design
The Andersen Tuff Chock is a rugged, multi-purpose ground wedge. Built with super-thick 1/4-inch walls, it is designed to resist deformation under heavy trailer tongue weights. Priced at $9.99 for a single unit, it provides an affordable, long-lasting replacement for hollow, brittle plastic chocks.
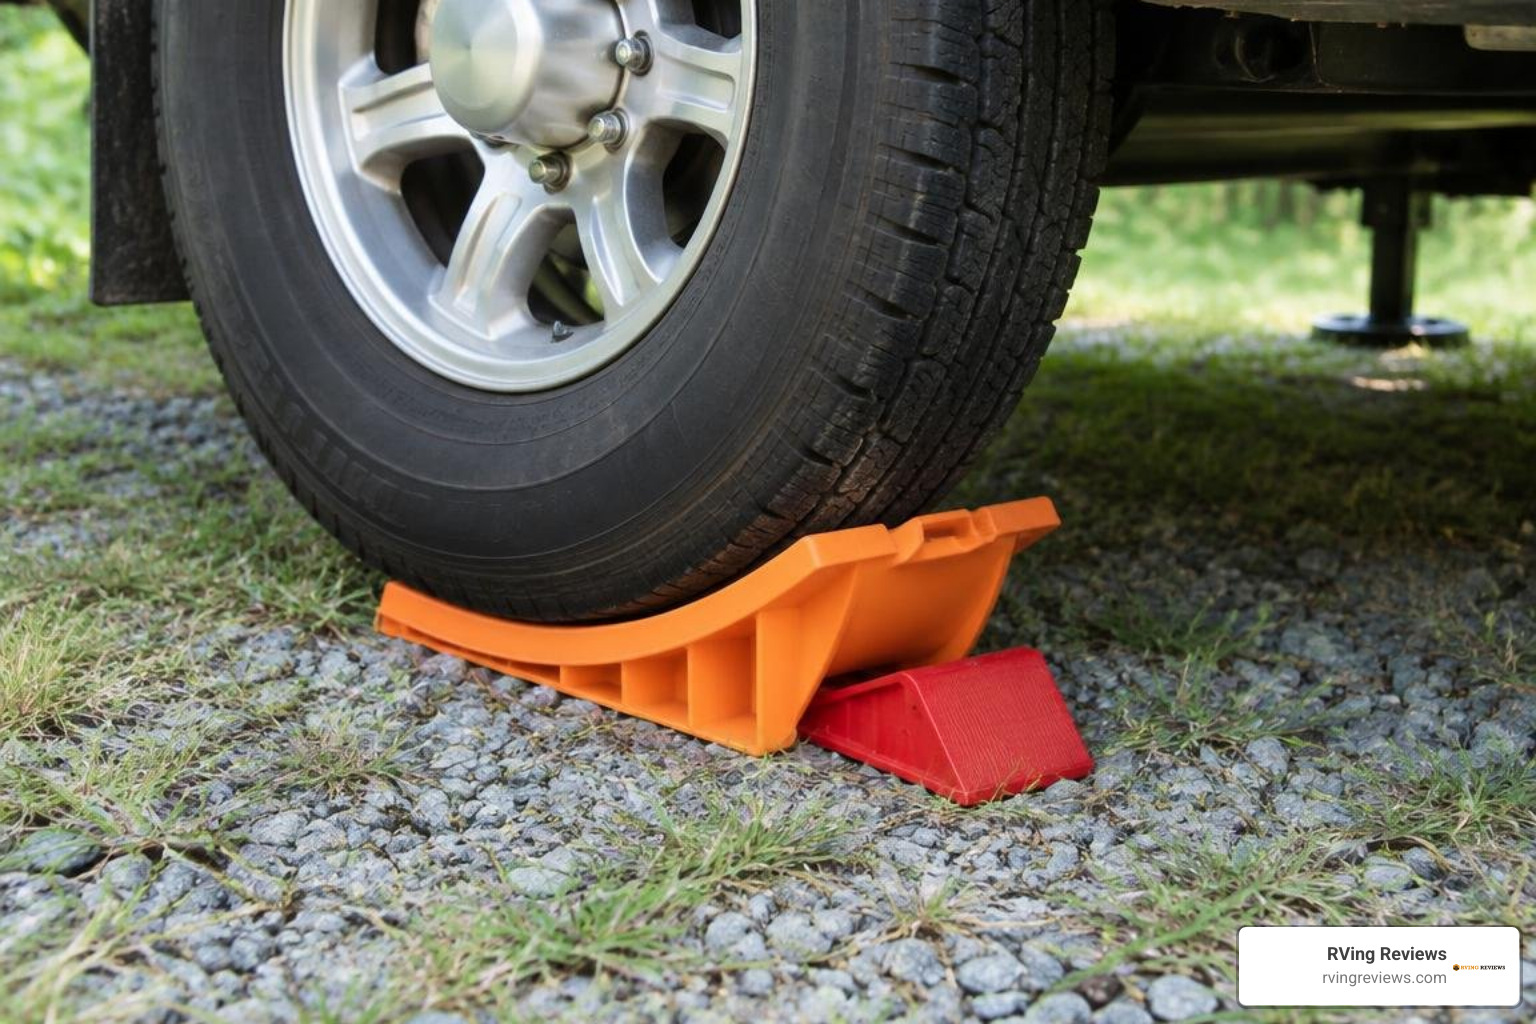
What sets the Tuff Chock apart is its dual-curved profile. One side features a standard wedge face for resting against round trailer tires on flat pavement, while the opposing side is contoured to mate with the curve of the Rapid Jack or Camper Leveler. When placed under the low end of a raised leveler, the chock creates a mechanical lock that keeps the ramp from kicking out under load.
Step-by-Step Guide: How to Level and Chock Your RV
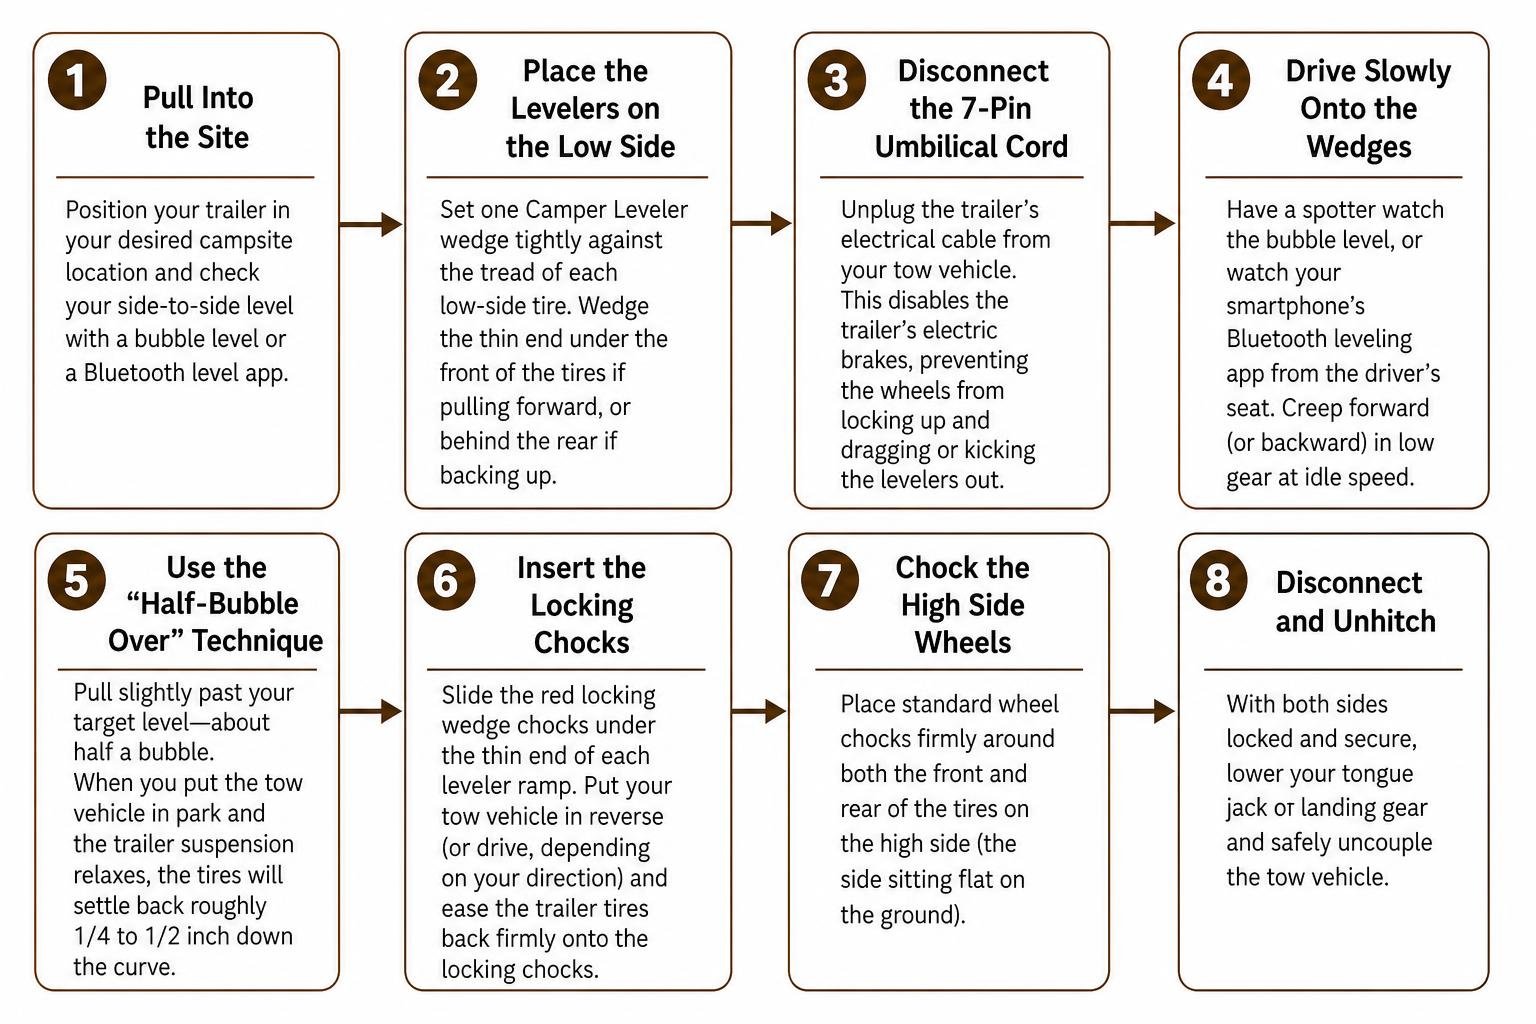
Leveling your rig with curved wedges takes less than five minutes once you know the proper sequence.
Here is the exact method we use and recommend:
- Pull Into the Site: Position your trailer in your desired campsite location and check your side-to-side level using a bubble level or a wireless Bluetooth level app.
- Place the Levelers on the Low Side: Set one Camper Leveler wedge tightly against the tread of each low-side tire. If you plan to pull forward onto the wedges, wedge the thin, tapered end directly under the front of the tires. If you need to back onto them, slide the tapered edge tightly behind the rear of the tires.
- Disconnect the 7-Pin Umbilical Cord: Unplug the trailer’s electrical cable from your tow vehicle. This disables the trailer’s electric brakes, preventing the trailer wheels from locking up and dragging or kicking the levelers out as you move.
- Drive Slowly Onto the Wedges: Have a spotter watch the bubble level, or watch your smartphone’s Bluetooth leveling app from the driver’s seat. Creep forward (or backward) in low gear at idle speed.
- Use the “Half-Bubble Over” Technique: Pull slightly past your target level—about half a bubble on a spirit level. When you put the tow vehicle in park and the trailer suspension relaxes, the tires will settle back roughly 1/4 to 1/2 inch down the curve.
- Insert the Locking Chocks: Slide the red locking wedge chocks under the thin end of each leveler ramp. Put your tow vehicle in reverse (or drive, depending on your direction) and ease the trailer tires back firmly onto the locking chocks.
- Chock the High Side Wheels: Place standard best RV wheel chocks firmly around both the front and rear of the tires on the high side (the side sitting flat on the ground).
- Disconnect and Unhitch: With both sides locked and secure, lower your tongue jack or landing gear and safely uncouple the tow vehicle.
How Anderson RV Wheel Chocks Work for Side-to-Side Leveling
The physics behind curved drive-on levelers is straightforward: rotating a curved plane under a round tire translates forward rolling momentum into vertical lift.
Unlike stepped leveling blocks that require full tire revolutions across flat steps, curved ramps raise the axle gradually. This allows you to stop at any height between 0.5 inches and 4 inches. The system accommodates trailer tires up to 32 inches in diameter and supports multi-axle setups up to 30,000 lbs GVWR.
For solo travelers, combining curved levelers with a smartphone-connected digital level eliminates the need for hand signals or trial-and-error guessing. You can monitor leveling increments in 0.1-inch steps directly from the driver’s seat.
Sequencing Setup with X-Chocks and Ground Wedge Chocks
A common question among RVers is how to combine curved levelers with between-tire scissor chocks (like BAL X-Chocks) and standard ground chocks.
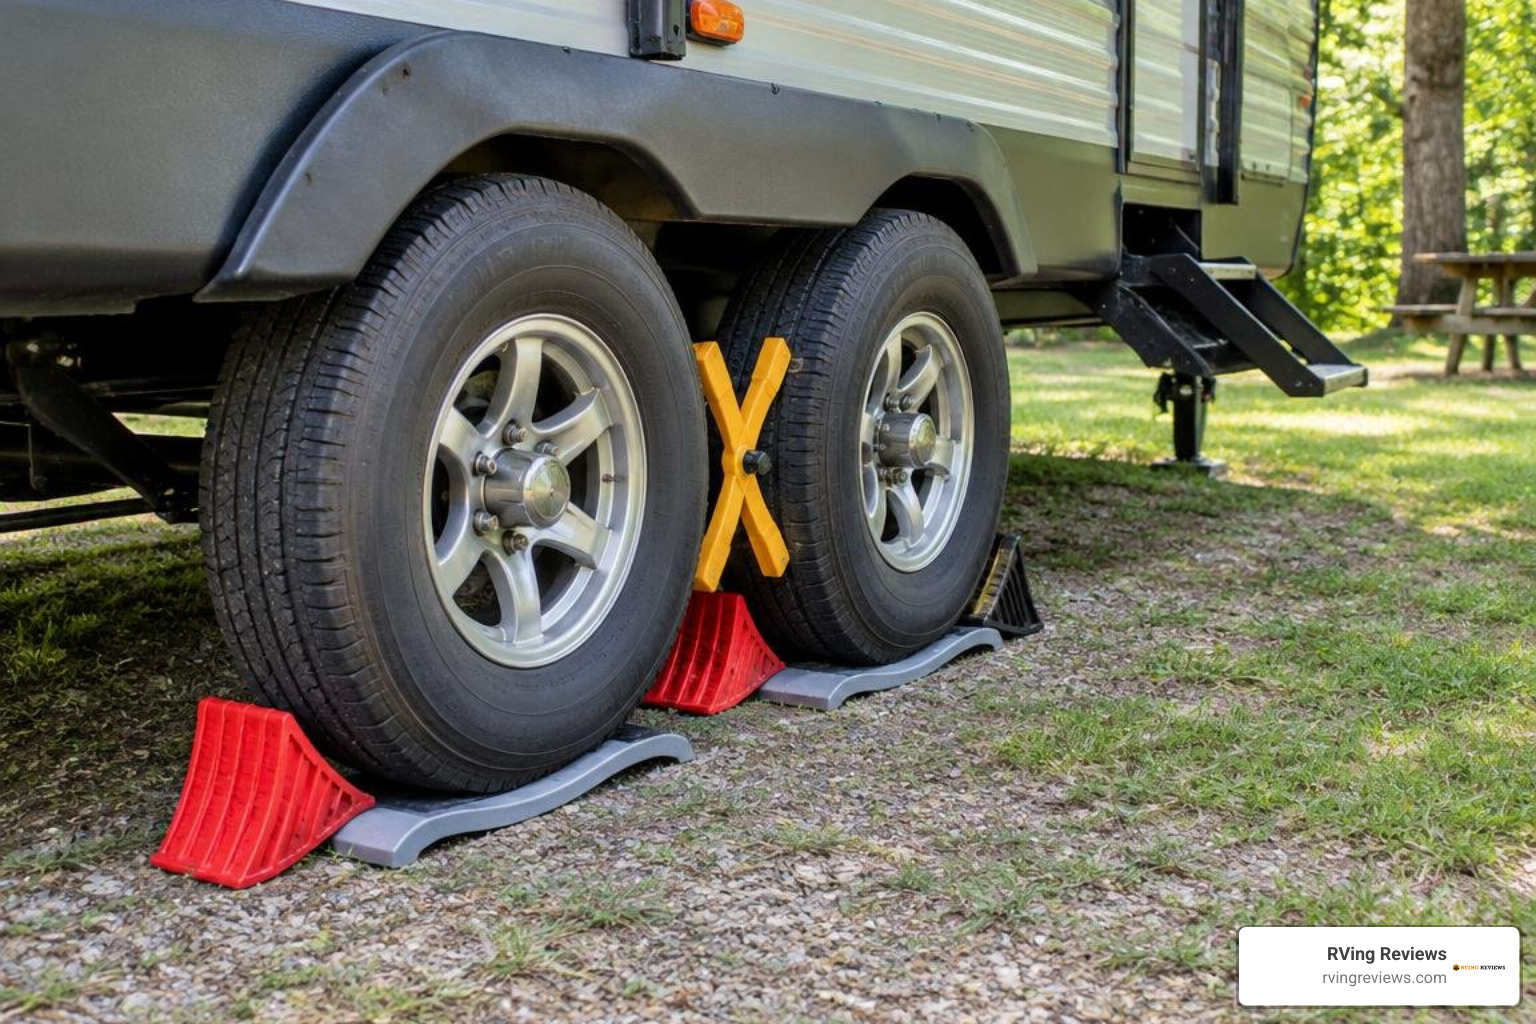
Proper sequencing is critical for safety:
- Curved levelers and locking wedges go on the low side first during the leveling process.
- Ground wedge chocks must be installed on the opposing high-side tires before unhitching from the tow vehicle ball.
- Between-tire scissor chocks (X-Chocks) should only be expanded between tandem tires after the trailer is leveled, disconnected, and the primary ground chocks are in place.
Between-the-wheel scissor chocks are designed to dampen interior floor movement and eliminate suspension bounce while walking inside the rig. They rely on outward friction against tire treads. If a tire loses air pressure or the tread is wet on a steep slope, an X-Chock can slip. As detailed in tandem wheel chock safety recommendations, you should never rely on between-tire stabilizers as your primary rollaway prevention. Always use ground wedges.
Furthermore, always remove between-tire stabilizers before hitching up or adjusting tongue jack height. Raising or lowering the tongue alters axle geometry; if X-Chocks remain locked between the tires, that movement puts severe lateral strain on trailer suspension components.
Limitations, Modifications, and Real-World Performance
While Andersen-style curved levelers are exceptionally convenient, they have practical limitations in certain campsite conditions.
On smooth garage concrete, frozen ground, or wet asphalt, the hard plastic bottom of the wedge can slide forward instead of biting into the tire tread. When this happens, the tire simply pushes the ramp across the ground.
To solve this, Andersen includes heavy-duty rubber traction mats to place beneath the leveler ramps. On loose gravel or soft mud, a wide rubber mat or a short length of timber prevents the wedge from sinking into the ground.
Another consideration is brand design. As explored in community discussions on knockoff vs original curved levelers, aftermarket brands like Beech Lane and Carmtek offer grooved, interlocking surfaces. While these mechanical ridges offer extra grip, the original smooth-faced Andersen design provides continuous micro-adjustments without locking you into molded teeth. As long as you use the included rubber grip pad, the original smooth design performs reliably on all surfaces.
DIY Hacks to Optimize Anderson RV Wheel Chocks on Tandem Axles
Travel trailers with compact frames or 14-inch wheels often feature tight tandem-axle spacing—sometimes with less than 3.5 inches of clearance between tire treads. In these cases, a full-length 15-inch leveler cannot slide between the tires to reach the ground.
RVers have developed three field-tested modifications to optimize their setup:
- Trimming the Tapered Tip: Using a miter saw or hand saw, cut 1 to 3.5 inches off the thin, leading edge of one leveler. The thick, load-bearing portion of the ramp remains intact, but the shortened nose now slips easily between tight tandem tires. Andersen endorses this modification, and it does not void the warranty.
- Adding Pull Ropes: When heavy trailers settle onto locking chocks, wedging forces make the chocks difficult to pull out by hand. Drilling a 3/8-inch hole through the center horn of the red chock and looping a 12-inch paracord handle through it allows you to pull the chock out quickly without pinching your fingers.
- Carrying 1×6 Riser Boards: If an uneven campsite requires more than 4 inches of lift, place a smooth 1×6 or 2×6 board on the ground with the rubber mat and curved leveler on top. This safely adds another 1 to 1.5 inches of elevation.
Changing a Flat Tire with the Rapid Jack: Tandem Axle Pitfalls
The Andersen Rapid Jack is designed to lift a tandem-axle flat tire without a bottle jack. You place the Rapid Jack directly in front of (or behind) the good, inflated tire on the same side and drive onto it. As the good tire climbs the 6-7/8-inch arch, the flat tire lifts into the air for easy replacement.
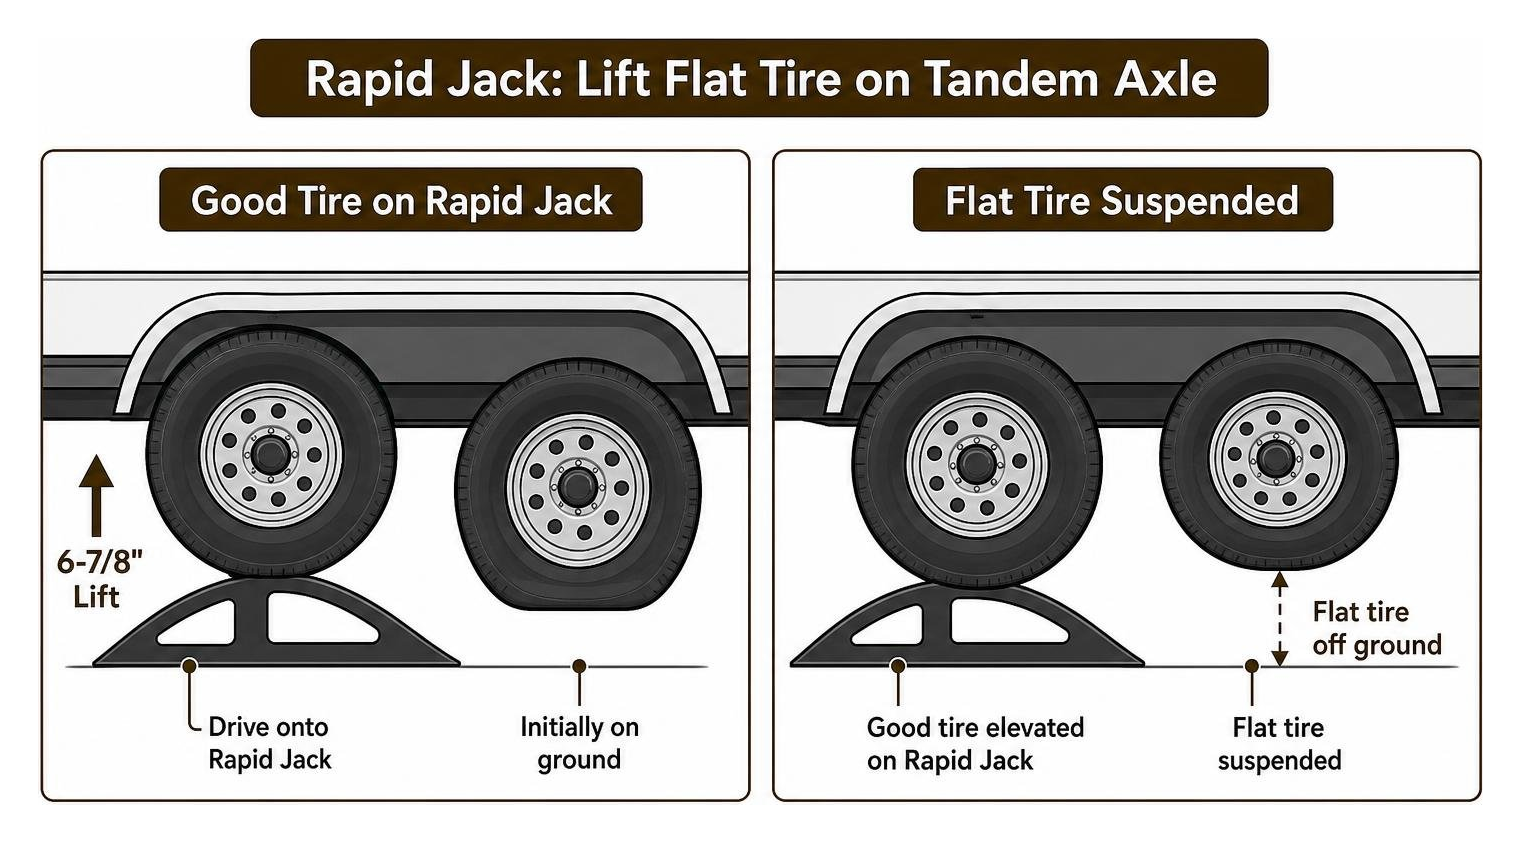
While this works smoothly on most standard leaf-spring trailers, there are three important pitfalls to watch for:
- Equalizer Suspension Droop: Tandem trailers equipped with center equalizers (teeter-totter suspension links) or long leaf springs allow the unweighted axle to droop downward. In some cases, the flat tire droops so much that it still touches the ground even when the good tire is elevated nearly 7 inches.
- Trailer Fender Clearance: Because the Rapid Jack is steep and tall, the top of the ramp rocks upward toward the trailer fender as the tire crests the apex. Ensure you have at least 3 inches of clearance between your tire tread and the trailer fender to prevent the ramp from denting sheet metal.
- Triple-Axle Incompatibility: Drive-on jacks cannot be used on triple-axle trailers. The load distribution across three interconnected axles prevents the middle or end axle from clearing the ground safely.
Safety Note: Never crawl under a trailer supported solely by a drive-on wedge. Once the flat tire is elevated, place a secondary jack stand under the frame before removing lug nuts.
Frequently Asked Questions About RV Levelers and Chocks
Are Andersen levelers safe to use as the sole wheel chock on a trailer?
No. On the elevated side of your trailer, the combination of the curved leveler ramp and its matching locking chock prevents the low-side tires from rolling. However, the tires on the high side (resting flat on the ground) remain free to rotate.
On inclines under 10 degrees, the low-side wedge lock provides substantial holding power, but you should never rely on it alone. Always place heavy-duty ground chocks against the front and rear of the high-side tires before disconnecting your hitch ball.
Can you use the standard Andersen Camper Leveler to change a flat tire?
Generally, no. The standard Camper Leveler (model AM3604) provides a maximum lift height of 4 inches. Due to trailer suspension sag and leaf spring equalizer droop, 4 inches of lift is rarely enough to suspend an adjacent flat tire off the ground. Most trailer manufacturers specify a 6 to 8-inch lift clearance for roadside tire changes. To change a tire using a drive-on ramp, use the dedicated Andersen Rapid Jack (model AM3620) instead.
What is covered under the Andersen Hitches lifetime warranty?
Andersen Hitches provides a lifetime warranty against manufacturer defects, cracking, warping, and structural failure under normal operating conditions for its molded levelers, Rapid Jacks, and Tuff Chocks. The warranty covers the original purchaser and guarantees product replacement. However, secondary accessories and moving wear parts (such as remote latch cables on specialized gooseneck conversion assemblies) are excluded from the lifetime replacement terms.
Conclusion
Leveling your travel trailer or fifth wheel doesn’t have to be a frustrating chore. By replacing rigid leveling stacks with the curved Andersen Camper Leveler system, you gain exact, continuous height adjustments from 0.5 to 4 inches in a single driving pass.
Pairing your curved levelers with heavy-duty ground wedges and secondary stabilization chocks ensures your rig remains safe, rock-solid, and level throughout your stay. For more expert recommendations on outfitting your rig with reliable camp setup hardware, explore our curated RV leveling blocks and chock guide. Safe travels and smooth camping!